And, as for the rest of you; if you're experienced knitters who have learnt this technique 54 years ago and don’t need me to tell you how to knit a few stitches - you're excused. You can go and play outside. I'll call you when the lesson is over. Or you can find some really complicated patterns and look at them while I'm trying to appear smart here! :)))
 So, this is how and why!
Turning a corner in knitting is just like making any other corner. Look at the corner of the frame in this picture. The sides of the frame meet in the corner and what a carpenter needs to do in order to avoid the overlapping of the two sides is to adjust the shape of their ends so that they would fit into the standard, 90° corner.
Naturally, when the carpenter making a wooden frame, his job is fairly simple- all he needs to do is to make a good calculation and to cut off the extra bits (or not, if he is Fred Flintstone!) but, in knitting, we cannot do that! So, unless you want to make knitted corners like Wilma Flintstone, I'd suggest you to learn how to turn it properly! :D
So, how do we knit it?
I made this simple illustration hoping that it might help you in understanding what we actually need our stitches to “do” when they reach a corner.

Let's just say that the eight (athletic) tracks in the bottom of the illustration are 8 stitches. The red a line is the beginning of our corner. The red line b is the end of the corner or, even better- the destination of our stitches. That is where they need to get!
Now, look at the route that each of the stitches needs to travel in order to get from the line a to the line b - the routes are not of the same length. While the inner stitch (track 1) is almost already there (maybe a row or two away from the destination), the outer one (track 8) needs to travel a very long way to get to that same position. In knitting language- we need to knit each of our stitches different number of times.
That is probably the most confusing thing about this shape (the same goes for sock heels!)!¨But the truth is, it is actually fairly simple. The main reason for confusion is hidden in the simple fact that, as knitters, we are generally used to creating a fabric working horizontally – back and forth or in circle! Our work grows in height (vertically) but we knit horizontally and create ROWS (horizontal lines of stitches). In every next row, a new stitch will grow form the previous one crating a RIB (a vertical row of stitches- tracks 1-8). And, while even the beginner is familiar with horizontal decreases and increases which cause our ROWS to get wider or narrower (horizontally- we're in charge of the situation), we generally take one thing for granted- no matter how many increases or decreases we have previously made in a horizontal line, all the stitches we are currently working with have grown from the same number of stitches knit in the previous rows. In other words, all the RIBS are of the same height (the vertical part is, thus, what we're not in charge of as that part happens naturally!). So, in regular knitting, when we cast on 10 stitches and make 10 rows, in the 11th row we still have 10 sts and they all have 10 rows bellow them.
But, that is not of much use now that we actually need to keep the same number of stitches (horizontally) until the end and yet knit different number rows from each, is it?!
That is why we need the short row method to put us in charge of the growth of each rib (because we're normally only in charge with what happens horizontally).
The Short row method allows us to temporarily exclude some of our stitches from the working process or to simply «put them on hold»! Moreover, it allows us to exclude stitches gradually which is exactly what we need here- you can see that the length of the routes is increasing gradually as well. By leaving the stitches that have travelled enough "on side" and continuing to knit more rows with other stitches (hence increasing the height of their ribs), we are able to respect every single route from the illustration above.
Once that we have reached the centre of the corner (the diagonal, white line), we can, again using the same method, bring the "forgotten" stitches back into the game and we can, again, do it gradually.
Finally, when we reach the point b, we will have both the same number of stitches on our needles as we did in the beginning and an evenly shaped corner. What more could we ask for?!
Now, let's see how this looks in practice! I'll use a very simple Short row method here!
TURNING A CORNER USING THE SHORT ROW METHOD
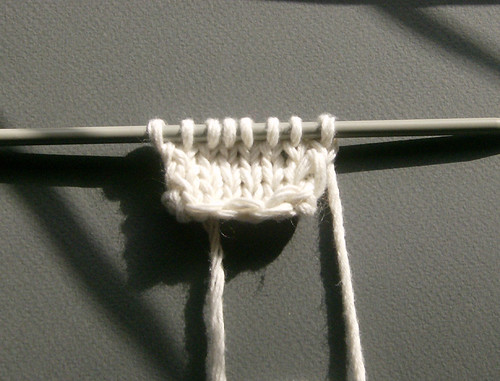
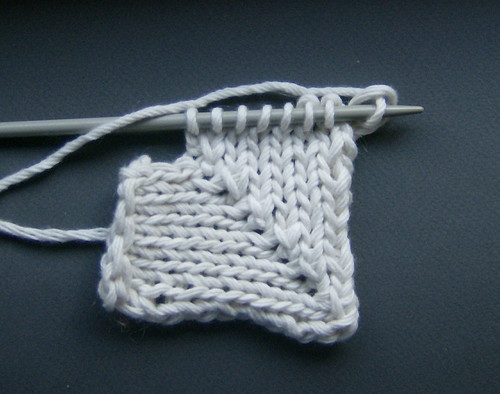
I'm working with 8 stitches and the stitches that are currently on my needle are at the a line position (I made a few initial rows just to show you that I can actually knit) :D !
We’re facing the right side of the work and starting with the outer stitch (track 8 in the diagram above). Now, whether you will slip or knit the first stitch of the RS rows is entirely up to you. I’ll knit it.
Then we continue knitting forth all the way to the last stitch . That one we will not knit!

So, step one is to knit across the row and to leave only the last stitch unknit on our left needle. (See the stitch on my left needle? I havent' touched it!)
Why did we do that? That is our “track 1” stitch (check out the diagram again), the one that is almost already around the corner. It will now have to wait here until we are finished working with the outer stitches.
Now, turn your work (so that you're facing the Wrong side), transfer that first stitch (that is the last stitch that we knit in the last row) onto your working needle without knitting it and purl across. You now have one less working stitch which, in my case, means 7. Turn your work again.

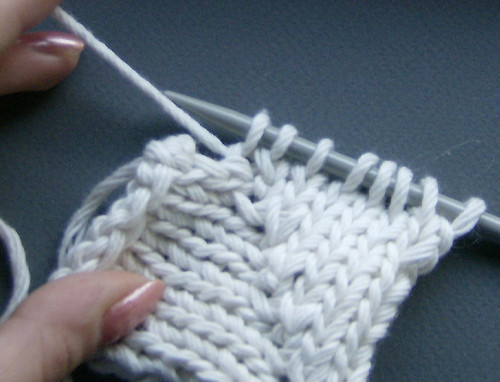
WE're facing the right side of our work again. In the next row, you will basically do the very same thing- knit across to the stitch that is next to last ONLY keeping in mind that, from now on- the last stitch refers to “the last WORKING” stitch. You can also see that, now that we have already excluded the lasts titch, a small gap has formed between it and our last working stitch. It it a great orientation tool, actually, as, foraslong as we continue excluding the stitches from our work, we only have to find the gap and we'll know how many stitches we have to knit- the working stitch that is right next to the gap, is the stitch that we will leave unknit on our left needle in the current row. It's as simple as that!
So, let's continue- slip or knit the first stitch and then, knit across until you reach the last working stitch and leave it unknit!

At the end of your second short row, you should have two stitches left unknit on your left needle as shown above.

Turn your work again, slip the first stitch as though to purl and purl across. Turn to the Right side.

Start the next row; knit across and put the third stitch “on hold”, as shown in the picture. Turn, slip and purl across.
Your rows will be getting shorter and shorter after each RS row. That’s why they call it the Short row method. :)))
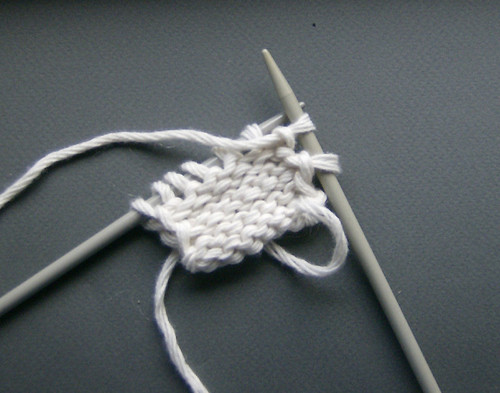
Continue working like that until…

…you’re left with only two working stitches. We are done with putting our stitches "on hold" now!
At this point, our stitches are parallel with the white line from the illustration; we’re in the middle of the corner. Now it’s time to bring all of our “left out” stitches back into the game.

Besides putting the stitches back into the game, we also have to close all the gaps that we have created along the way.
So, start by slipping or knitting that first stitch and now knit the next two stitches (tracks 7 and 6) together (k2tog or ssk, whichever you prefer) to close that first gap between them (the "green" sts).

Done!
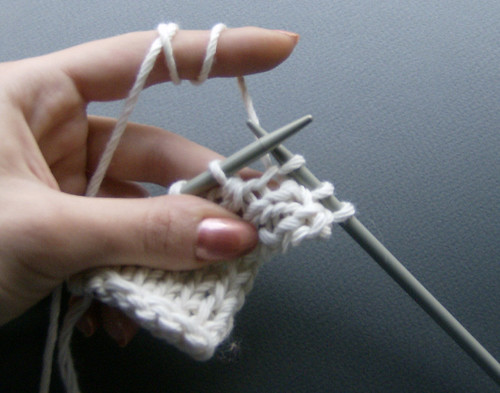
But, since now that we have closed the gap we are one stitch short (we have 7 instead of 8)we need to make one (m1) . So, by pick up a stitch from under the vertical bar between the stitches and knit. (I'm making that stitch in the picture above.) Once done, turn the work, slip that first stitch (the one that we just made) and purl across.
Turn to the right side!
Turn to the right side!
We started working on this row with only two working stitches and now we have three- our rows are now growing rather than shrinking. (They never tell you that there is a Long row part in the Short row method, do they?! :)) )
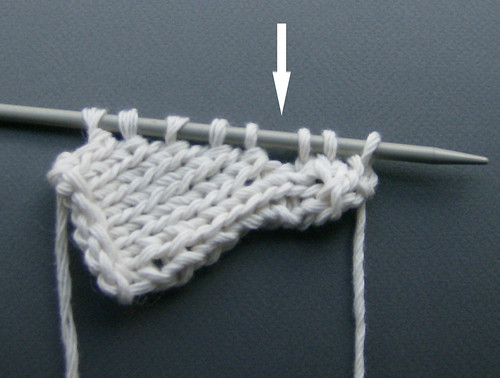
In your next row you will knit two, close the next gap (the white arrow) by knitting the 3rd (the newly made st) and the 4th stitch together after which you will again have to make one new stitch (m1). It sounds far more complicated than it actually is, I know, but I'm sure that, by now, you know what to do even without following the instructions.
Then you will, again, turn the work and purl across. And again and again.
Then you will, again, turn the work and purl across. And again and again.
RS- knit to the stitch next to the gap, close the gap (k2tog), make one (pick it up!), turn.
WS- slip one, purl across.
In every next row, you will have one stitch more to knit before reaching the "gap stitches" (long row!!! ). That is because you're moving back to the center of the corner and gradually including the left out stitches into the working process as you knit along!
Work like that all the way to the last stitch.
Once you close the last gap, don't forget to make that last "extra" stitch to compensate for the decrease (I forget to do it approximately always! :) )
The last gap closed and the last stitch made means that you have just put the "track 1" stitch back into the game.
Turn your work one more time and purl across to give it that last push around the corner! :)
Turn your work one more time and purl across to give it that last push around the corner! :)
And our corner is now "around the corner". Our stitches have arrived to the b line position.
Now, bare in mind that we use the Short row as a METHOD when turning the corner but there is more than one stitch technique that we can use for it in order to achieve pretty much the same result. I decided I'd use the easiest one that required no additional explanations. Another very common short row technique is called “wrap and turn” in which we wrap the stitches instead of just slipping them onto the second needle and then knit them together with the wrap on our "way back". The latter method leaves smaller gaps. Apart from some lacy Short rows that include YO-s and can stretch a corner a bit (though, they can be very decorative as well), most knitters decide which version to use depending upon how they want the middle line of their corner to look like. But the principle of the method always remains the same. Turn a few corners by using any stitch technique just to get a hang of it. Later, you will pick your favourite stitch technique or decide which stitch would be best for your current project.
(NOTE: I’m knitting the Eastern uncrossed style so your k2tog might not look exactly the same as mine if you’re a Continental, English or Combo style knitter but that doesn’t really matter. )
Meni ovo izgleda užasno komplikovano! A jako mi treba, što će reći, moraću da se udubim u problematiku....
ReplyDeleteWow, thank you! That's the most useful tutorial I've ever seen. Nice explanation and clear pictures! I'm bookmarking this for the future - might knit a blanket someday. Or a dishcloth. Dishcloth, probably, I don't think I have the attention span needed for a blanket.
ReplyDeleteI'm turning this into a pdf file and saving in Tutorials!
ReplyDeleteBensedin art, ako nešto zapinje, viči, možda i u postu štagod fali.
ReplyDeleteUstvari je vrlo prosto- probaj jednostavno ići po slikama bez mnogo razmišljanja o tome šta zapravo radimo. Čim "okreneš" prvo ĆOŠE :) , postaje jasno k'o dan.
Jednostavno na kraju svakog reda (na pravoj strani)- ostavi jednu očicu i nastavi raditi s ostalima. Dok ne ostanu 2. (tu, realno, nemamo šta raditi- prebacili bi jednu, ne dirali drugu, okrenuli pa opet prebacili :))) - nema smisla. A i vanjsku očicu ne valja plesti s ostalima u oduzimanje jer se kvari rub rada, naravno.) I, kad ostanu 2- kreneš nazad. prvu skineš (ili spleteš, svejedno, znaš već da je to proizvoljno) i samo zatvaraš rupice tako što spleteš očice oko svake. Zatvoriš rupicu- napraviš jednu očicu odmah pored da nadoknadiš gubitak i okreneš. Kriva strana pa opet prava. Rupica je sad za jednu očicu dalje, dakle, pleteš do nje, opet zatvoriš, napraviš očicu, okreneš pa tutanj nazad. I tako do zadnje. Dok budeš radila "samo će ti se kasti" kojim sistem se očice stavljaju u "stand by" i kasnije uključuju u igru i šta se time postiže.
Prosto je ali, kažem- nismo navikli da pletemo u raznim pravcima, zato je nekad zbunjujuće na prvi pogled. a prncip je, u suštini, grozno jednostavan. ;-)
I'm glad you like it (even more happy if you actually think it is useful :) ).
ReplyDeleteIf you think that some parts are not well explained, please don't be too shy to say so- when one is familiar with the technique- every second picture can look sufficiant. I tried to keep in mind how much some tuts full of pics have helped me in understanding different techniques!
It's a good thing actually that i've been asked to make this because, as I have mentioned somewhere in this post- this is what, basically, "turning the sock heel" is all about. Once you become familiar with the Short row in general, it's not that hard to unravel the heel any more.
So, I'll surely get back to this soon!
This is a hell of a good tutorial - thanks! :) Even though I did learn to knit 54 years ago (not literally, I just added approximate number of my mother and grandmother's knitting experiences) it's still very valuable lesson. I'll use this in my next blankie project - the last one I did I crocheted the border, because I was to lazy to pick up all those stitches and knit, frankly. ;)
ReplyDeleteHehe, thanks, glad you like it! Feel free to play around with the decreases, you're an experienced knitter, you're safe :) - some other decreses (instead of k2tog) can give very interesting result. The corner needs decreses to shape but it doesn't really matter how you make them. I wanted it to be as simple as possible so I used the "easy short row" and the easy decrease system. Though, of all the short row techniques I've tried- i still like this one the best. Knitters usually tend to avoid the forming of that middle line but I quite like it.
ReplyDeleteOMG!!! I am amazed form your blog: the look , colors and everything that you are using for it. I have seen your work before at Ravelry, but never seen your blog. I really like them both...Nice job!
ReplyDeleteBy the way, I like this tutorial, I can certainly use it in the future.
Hi, Drenka, glad you like it! Ye, it takes time to find all these blogs and connect the Ravelry "faces" with them, doesn't it? I guess we got used to facebook system easily- and someone else doing all the linking for us! :)
ReplyDeleteGlad you like the tutorial and, from what it seems, there'll be a second part to it- I've been asked about the rounded corner system, should have thought of that myself! :)
Ooh nice tutorial and very easy to understand. I suck at short rows and have to learn them for the double knit socks I'm attempting lol (Its in my projects page!) :D
ReplyDeleteSIde note: I finished the pink sweater :D
Thank you so much! E. Zimmerman's instructions were just not enough. I couldn't understand how to turn a second corner going into a different direction. Was so confused! And would keep trying to knit and knit again and again.
ReplyDeleteThank you! I will refer to this again.......and again...... Your experience and generosity is much appreciated!!
ReplyDeleteThank you so much. I have been looking for a long time how to go round a corner with a mitered corner.Your details and pictures were so clear and very helpful. I can now after a very long time get on with my project a baby's blanket.I just need to work out how I will attach to sides and have a wider border and I think it will be in garter stitch.Once again Thank you from a very happy person .
ReplyDeleteExcellent tutorial, I've been Knitting for many years but never managed to mitre a corner before now, it's made my lace blankie look so professional. Thank you so much.
ReplyDeleteI'm going to look for you on Ravelry now.
Excellent tutorial. I'm knitting a baby blanket for my grandson and looked everywhere and was stuck how to work my knitted lace edging around the corner. Thank you so much for your clear instructions and pictures. Made my day!
ReplyDeleteWhoa, the pictures in this are great and your explanation is really good! I'm gonna give it a go now!!! Thank you!!
ReplyDeleteFantastica!
ReplyDeleteFatto! Grazie! Mi piacerebbe pubblicare la foto ma qui non si può...
ReplyDeleteFantastic…..thanks for the explanation ….!!
ReplyDelete