a very smart question:
How do we make A ROUNDED corner, than? Can we knit it?
(You do read this, after all!) :)))
CAN WE???? Give me a pair of needles and lots of yarn and I'll make you a very rounded Boeing 747. (Plus, leftover sweaters for the trolley-dollies!).
Of course we can! I should have thought of that myself, shouldn't I?
No additional knowledge needed here, it's all there in the first post only now a bit adjusted. We will actually work less this time.
 You could see in the first post that the Short row method, which basically helps our stitches to change their direction, also helps the corner to form the shape of a square and allows some of the the stitches to travel longer. Now, as you can see in the illustration, a rounded corner is generally smaller and, thus, the outer stitches need to travel a shorter route (you can compare this illustration with the first one). Plus- we don't want the final result to be square shaped. Still-we do need the stitches to “turn” so we'll use the very same Short row only this time we will gradually exclude the inner stitches (instead of all of them) from our working row. They will than push the whole work into a new (desired) direction while the outer stitches will naturally follow their route and create that fine curve we're after here. It will soon make a lot more sense, I promise!
Now, how many inner stitches you will actually put «on hold» and whether you'll use 1/2, 1/3 etc. of all the stitches, will basically depend of the shape you want to achieve (there is no RIGHT shape of a rounded corner).Generally, the more stitches you put «on hold» (temporarily exclude from the working process), the less rounded your corner will be. Just for demonstration, I will work with the inner HALF of all the stitches which, I believe, is the optimal choice. But I've already started making a several swatches with my left hand so that I could have them finished by the time I'm done typing this post with my right hand (I know, it's a great thing that I can knit with only one hand! :)) ) and, in the bottom of the page, you’ll find examples of corners made with short rows of different length.
Let's begin!
TURNING A ROUNDED CORNER USING A SHORT ROW METHOD
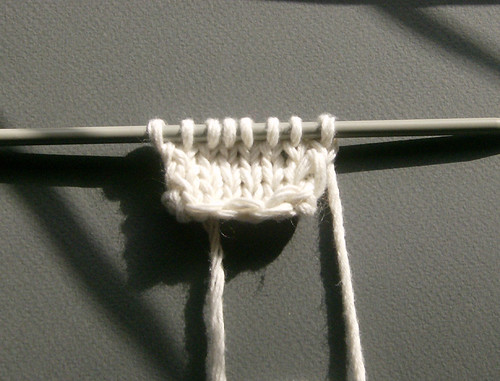
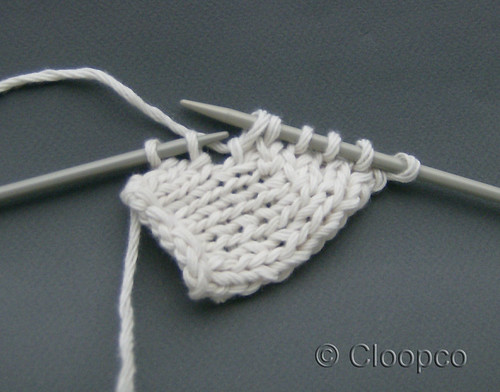
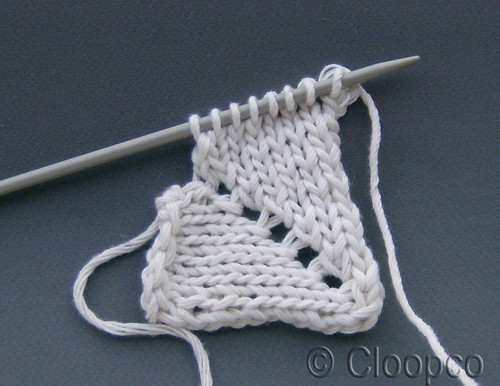
I'll be working with the total of 8 stitches just like the previous time (picture 1).
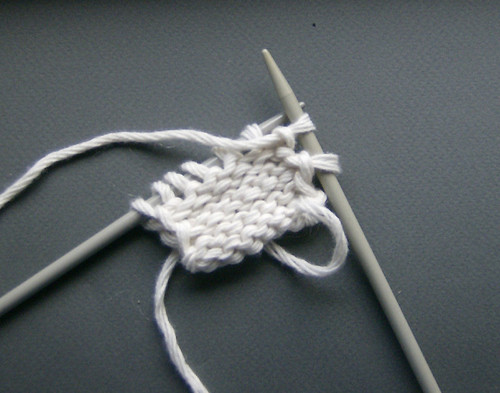
So, start turning the corner when you're facing the right side of the work and knit across leaving the last stitch unknit on your non-working (left) needle (picture 2)
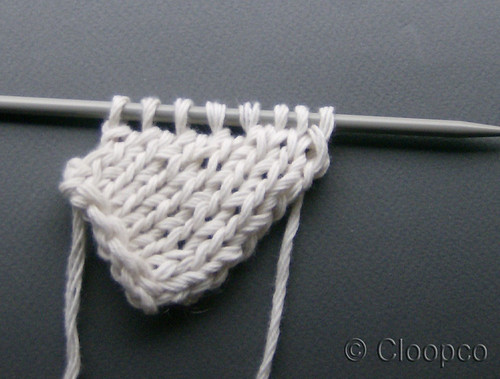
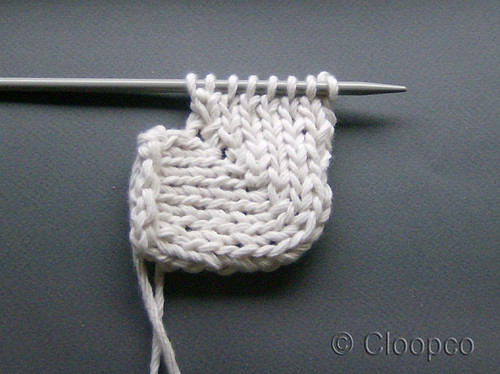
Turn the work; you have now decreased the number of your working stitches for one. In my case it means I’m now left with 7sts . Slip the first stitch onto your working needle without knitting it and purl across. Turn. (picture 3)
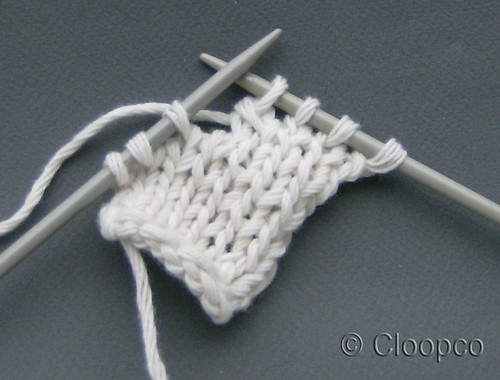
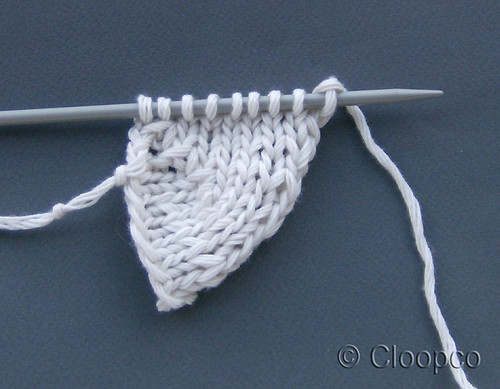
Now, repeat the steps from your first row; knit across and leave the last stitch unknit again, only now, leave the last WORKING stitch unknit. At the end of this row, you will have two stitches left on your non-working needle (picture 4). Turn.
Slip that first stitch on the wrong side of the work and purl across (picture 5) . Turn.
Again, knit across leaving the last stitch unknit (picture 6). Turn.
WS - slip one, purl across. Continue in the same manner until you have put one half of all the stitches you started working with «on hold» (or, until your short-working row counts one half of all the stitches, if you like!). In my case it means 4/4!
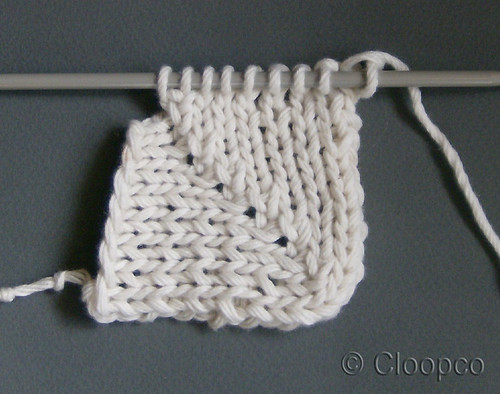
Now, unlike in the first example when we used this method for all but the last two stitches- we will now stop here and switch to the «long row -part» right away. Again, we're doing everything almost exactly the same as we did in the first example; on our way back, we’re closing the gaps between the stitches one by one, each time making an additional stitch to compensate for that decrease. As we knit along, the gaps will be moving one place to the left in every next row and, each time we close one gap, we will actually put one more «on hold» stitch back into the game. The only difference this time is that the first gap is in the very middle of our work, between the last working and the first non-working stitch. It's pretty visible from the picture above. 4 sts on one side, 4sts on the other side and 4 gaps.
So, we will start by knitting the outer stitches normally (in my case- the first 3), then we’ll knit the central pair of stitches together (k2tog; or you can use another simple decrease method) to close that first gap (the above picture), and finally make one by picking it up from under the vertical bar between the stitches.
Once done, turn your work. Your working row is now one stitch longer (in my case 5sts) and you’re facing the WS of the work. Slip that first stitch and purl across. Turn.
 The right side again! Knit across to the stitch next to the gap (in my case- k 4), knit it together with the stitch across the gap (my case- 5th and 6th st k2tog) and make one (in the above picture).Turn.
The wrong side- slip one and purl across.
Keep repeating these steps until you have closed your last gap and made that last stitch in the very base of the corner. Turn the work and purl across.
Your result should look somewhat like this. The end!
If I have skipped to explain something important, don't be too shy to say so! :)
And, now, like I promised, here are some examples of corners made by manipulating the number of stitches different from the number used in the example above. Just for demonstration, I also used a different decrease style for each sample.
This is the result of a short row method used only on the first THIRD of all the stitches. I CO 9 stitches because the total number should, in this case, be dividable with 3 and I stopped excluding the inner stitches when the number of the "left out" stitches has reached 3 (6 stitches in the working row). (Decrease method used: k2tog tbl/k2tog twisted)
You should be careful with this corner because, unless you're working very loosely or intend to severely block your project later- this corner could easily deform the shape of your garment as it does not form the 9o degrees angle.
This is a 6/9 version; I stopped excluding the stitches once there was only one third of all the stitches in my working row (two thirds of all the sts gradually left unknit -6 in this case). In this example, only the peak of the corner is basically rounded. I quite like this one!
As for the middle line, this lovely look is the result of s1k1psso instead of k2tog.
Depending of the gauge,the shape of the garment, the type of yarn you're using etc. you might want to use a different system ; 2/5 , 4/6 etc.
I the end, a few more examples...
To make this lacy middle line, make YOs instead of m1 (make one by picking it up) after each decrease (this is a Eastern k2tog + YO or Continental/English ssk+YO version). Only in this case, you need to purl the first stitch (YO) in every WS row. It's actually quite a funny business to knit a loop with its own tail but the result is cool. Also, bare in mind that this decrease stretches the corner a bit so, you might want to use a different (tighter) decrease for the first 2 gaps and than switch to YOs. That way, you'll, of course, have the eyelets only in the inner part of the corner. But it works just fine with a 1/3 version.

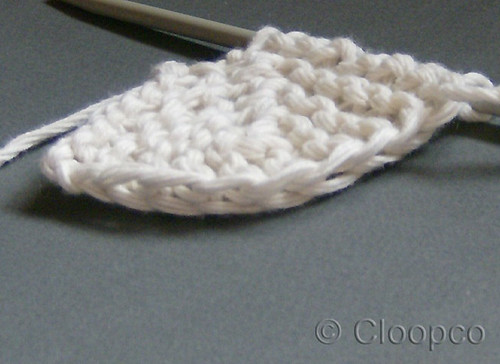
Of course, you can use stitches other than stockinette to make a corner, too. This is the example of a garter stitch corner. You shouldn't have trouble figuring this one out. Just knit on both sides. 1/2 version on 8 stitches again with a s1k1psso decrease.
Finally, in case you decide to slip the first stitch in every RS row, this is how the edge of your corner will look like.
I believe I'm done here! :)))
Poklopila sam se ušima kad sam pročitala komentare u prošlom postu! Svi ukapirali, a ja gledam u belo. No, rešila sam da probam, nadam se da ću se izboriti i sa ovim i sa onim uglovima!
ReplyDeleteJa moram uzeti igle u ruke da sve ovo isprobam, ovako je beznadežno. Hvala ti na ovome!
ReplyDeleteKad se izboriš s jednim, izboriš se i s drugim- identični su, samo s oblima ima manje posla.
ReplyDeleteOvo je super princip jer se koristi za mnoge stvari- kragne, suknje, proširenja za grudi (bar onima kojima to treba, ta razliku od mene :))) , sve je zapravo sistem oblog ćošeta. I pete na čarapama! :)
Time is of the essence and I have shaved off many hours of practicing a technique that was never taught to me. Thank you for the clear and precise pictures of each corner. Much appreciated.
ReplyDelete