Saturday 21 February 2009

My name is Maja and I'm a YARNOHOLIC

I've been asked to take three surveys about my knitting and yarn buying habits lately. Most bloggers whose blogs I regularly visit have been talking a lot about their stashes and about the (imaginary and, oh, so, not going to happen) big “stash down” or at least "destash" of the 2009 these days, too.They're all very fond of words such as "intend", "will", "off", "away", "plan".... There are several Ravelry groups encouraging people to «stop buying and start knitting» (also providing advices and best wishes for hopeless cases). The discussion board topics in such groups are called: "Are you addicted?", "I'm taking a step towards sanity" (I bet), "I need some help" etc. while the posts usually start with "OMG!!!!!", "My husband is going to kill me", "My bank is evil"... and similar lines. I believe you get the picture!
Finally, there is a survey about yarn buying habits and "losing the wagon" when it comes to yarn in funny Yarnoholics Anonymous group (Ravelry again) with, so far, pretty scary results!
Promises, decisions, resolutions...and the power of will flashing from every post.

Are we that desperate? (Are YOU, I mean!) :)))

Now, I know that the "New Year's resolutions and (fake) promises time" was not so long ago and that we're still pretty much under the impression of our own constructivism and will (it is so touching to see how smart and decisive we can actually be!) but, Ladies and Gentlemen- it's the end of February and I think it is just about high time for you to admit to yourselves that nothing is actually going to change. Plus, you're probably over 30 so you should now start growing up. Seriously!

I’m writing my own statement!

Are You a Yarnoholic?
Yes, I am! (Not anonymous, though!)

Did you ever try searching for a pro help?
No, but I did try to help myself! Last autumn, I was walking in my old boots when I realised that with the money I had spent on yarn in a single month, I could have bought myself a new pair of "Gucci", so I decided I’d punish myself with a pair of 15eur boots.

Did it work?
No, because that pair of boots has proved to be one of the best pairs I have ever owned and I just might continue buying cheap boots in the future as well. That way I’ll have more money for YARN!

Do you behave or act strangely (in any way) when you see a picture of yarn?
I do! My pulse changes, I start shaking, I can hardly breathe and I usually experience a sudden lust- stroke. Well, lust or love, still not completely sure! (I know of some people who react in the very same way when they see OTHER things in pictures!)
I think I even hear voices!

Do you dream of buying more yarn?
Every night! And I dream of sniffing it!

What was the most you’ve spent on yarn in one trip?
Couldn’t really tell! I once bought about 5 kg of beautiful Italian yarn but it was on 50% discount because the firm was closing down! I never felt sorry for that!

Have you bought yarn because you felt obligated?
Used to! Not any more. Now I make small crochet hearts for Valentine ’s Day or lacy stars and New Year’s decorations and take them to my favourite yarn shops. The owners love them, use them to decorate the entrance and make friends with me! :D Now they sometimes suggest me to take some time to think before I open my wallet. Even make me a cup of coffee ! :)

Where are you more helpless to buying? Online or in person?
In person! I’m a very moderate online buyer - I buy what I need and what I can’t find elsewhere! Enough for a sweater or a dress and that’s it! The offer is way bigger but I’m completely hopeless when surrounded by walls covered with yarn. And it’s not just how to NOT buy too much but I’m also having trouble controlling myself not to go back for more (yarn I won’t need). Or buying 10 skeins of yarn in different colours just to TEST THEM. (These colours never match, needless to say!) I always need that ONE MORE skein. Or AT LEAST one. Sometimes I use them for cool one-skein projects (Examples ONE and TWO), most of the times I don’t use them at all!

A clear example :)))
What are your favourite colours?
Earthly shades, red, Indian-summer colourway, green… I love colours!

Do you still buy yarn in colours you actually don't like?
Of course I do! How else would I know I don't actually like them!

Have you bought yarn that is outside your regular comfort zone? Either by color or by texture or by gauge?
I don’t think I actually have my own comfort zone. I’m not really keen on working with cotton yarns but that’s about it.
I once bought two skeins of novelty fuchsia yarn- cotton tape + pink strings + “fringes” + violet “something-s”…I want to believe I was feeling very pink and cool that day so I forgive myself. :D
What is the “weirdest” fibre you have ever used for knitting?
I don’t like experimenting much. I sometimes knit with hemp twine, though. I also had one successful attempt of knitting with bias binding.

Though, my hair often gets tangled in my work so, I should probably say that i knit with my own hair(cut) allot. Considering the “yardage”- I should use it more often! :)))

What yarn or fibre would you like to try knitting or crocheting with?
Alpaca, definitely! And camel hair! Oh, and cashmere is still Nr.1. I almost don’t want to order any because than I’d have to stop dreaming about it. (BISON too sounds convincing!)

What yarn or fibre would you never knit with?
Nylon bags! Dog’s hair! Aaaaaa

Is there any type of yarn you used for knitting though you thought you never would?
I never thought I’d make a garment all from boucle yarn but then I found a huge stash (ove 20 skeins) of rose and deep red boucle yarn my Mom didn’t know what to do with- I’ll have to use it some day.

Do other people (family, friends, boyfriend, husband…) ever buy you yarn?
My mother buys yarn and I often steal it but I can hardly cal that a present (stollen goods, more likely). So, I’d say no!
But I often get yarn from people who were never meant to be knitters! They sometimes tell me they’ve got “LOTS OF YARN” in their closet and then come back with a skein or two in their hands (wouldn’t want to be in their tailor’s shoes when he tries to explain them that a gown can not be made from a square meter of fabric).
Never meant to be knitters usually start knitting when they get pregnant and abandon the craft approximately 9 months later. Their first projects are generally baby-sets. Lots and lots of baby blue, pink, yellow and sometimes lime! agrhhh But I get their needles, too!

Do you think people who buy you yarn know your taste ?
No!!! (obviously)

Scraps. Do you keep them or toss them?
Longer than 10cm (4 inches)- keep them. They’re good for stuffing decorations (though, it’ll take me about 20 years to use all the sponge from my Mom’s 80’s shoulderpads). Pure wool- keep them regardless of the size- good for felting. Short tails with less than 70% wool- toss!!!


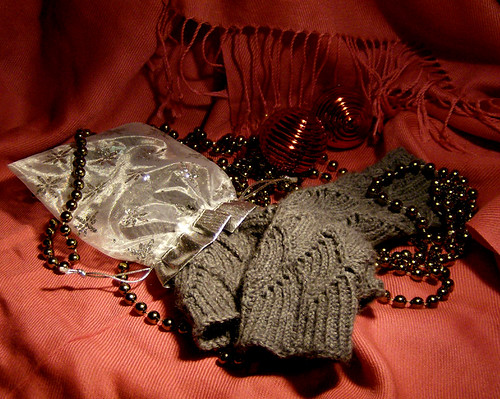
What’s in your sacred stash?
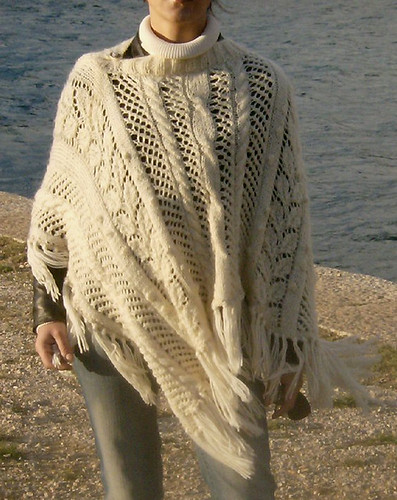
About 2 kg of beautiful pearl white and peach/rose mohair lace yarn made from top quality hair of Turkish goats. Another bargain- I believe that the price per skein was about 1/3 of a regular price of an acrylic yarn skein. These skeins are so sacred that I’m almost scared to knit them. But when I do have a good idea- I’m not afraid to use them- I even doubled the thread for my favourite white poncho and I’m not sorry! :) Another skein is turning into a Luna Moth shawl these days.

How much have you spent on yarn so far?
Do you want me to shoot myself?

Where will your stash go when you go?
This one always makes me laugh! :)))


Sunday 15 February 2009

Turning a rounded corner (around the corner)

In addition to my previous post -

a very smart question:

How do we make A ROUNDED corner, than? Can we knit it?
(You do read this, after all!) :)))

CAN WE???? Give me a pair of needles and lots of yarn and I'll make you a very rounded Boeing 747. (Plus, leftover sweaters for the trolley-dollies!).

Of course we can! I should have thought of that myself, shouldn't I?

No additional knowledge needed here, it's all there in the first post only now a bit adjusted. We will actually work less this time.


You could see in the first post that the Short row method, which basically helps our stitches to change their direction, also helps the corner to form the shape of a square and allows some of the the stitches to travel longer. Now, as you can see in the illustration, a rounded corner is generally smaller and, thus, the outer stitches need to travel a shorter route (you can compare this illustration with the first one). Plus- we don't want the final result to be square shaped. Still-we do need the stitches to “turn” so we'll use the very same Short row only this time we will gradually exclude the inner stitches (instead of all of them) from our working row. They will than push the whole work into a new (desired) direction while the outer stitches will naturally follow their route and create that fine curve we're after here. It will soon make a lot more sense, I promise!

Now, how many inner stitches you will actually put «on hold» and whether you'll use 1/2, 1/3 etc. of all the stitches, will basically depend of the shape you want to achieve (there is no RIGHT shape of a rounded corner).Generally, the more stitches you put «on hold» (temporarily exclude from the working process), the less rounded your corner will be. Just for demonstration, I will work with the inner HALF of all the stitches which, I believe, is the optimal choice. But I've already started making a several swatches with my left hand so that I could have them finished by the time I'm done typing this post with my right hand (I know, it's a great thing that I can knit with only one hand! :)) ) and, in the bottom of the page, you’ll find examples of corners made with short rows of different length.
Let's begin!

TURNING A ROUNDED CORNER USING A SHORT ROW METHOD

I'll be working with the total of 8 stitches just like the previous time (picture 1).

So, start turning the corner when you're facing the right side of the work and knit across leaving the last stitch unknit on your non-working (left) needle (picture 2)
Turn the work; you have now decreased the number of your working stitches for one. In my case it means I’m now left with 7sts . Slip the first stitch onto your working needle without knitting it and purl across. Turn. (picture 3)

Now, repeat the steps from your first row; knit across and leave the last stitch unknit again, only now, leave the last WORKING stitch unknit. At the end of this row, you will have two stitches left on your non-working needle (picture 4). Turn.
Slip that first stitch on the wrong side of the work and purl across (picture 5) . Turn.
Again, knit across leaving the last stitch unknit (picture 6). Turn.
WS - slip one, purl across. Continue in the same manner until you have put one half of all the stitches you started working with «on hold» (or, until your short-working row counts one half of all the stitches, if you like!). In my case it means 4/4!


Now, unlike in the first example when we used this method for all but the last two stitches- we will now stop here and switch to the «long row -part» right away. Again, we're doing everything almost exactly the same as we did in the first example; on our way back, we’re closing the gaps between the stitches one by one, each time making an additional stitch to compensate for that decrease. As we knit along, the gaps will be moving one place to the left in every next row and, each time we close one gap, we will actually put one more «on hold» stitch back into the game. The only difference this time is that the first gap is in the very middle of our work, between the last working and the first non-working stitch. It's pretty visible from the picture above. 4 sts on one side, 4sts on the other side and 4 gaps.


So, we will start by knitting the outer stitches normally (in my case- the first 3), then we’ll knit the central pair of stitches together (k2tog; or you can use another simple decrease method) to close that first gap (the above picture), and finally make one by picking it up from under the vertical bar between the stitches.


Once done, turn your work. Your working row is now one stitch longer (in my case 5sts) and you’re facing the WS of the work. Slip that first stitch and purl across. Turn.

The right side again! Knit across to the stitch next to the gap (in my case- k 4), knit it together with the stitch across the gap (my case- 5th and 6th st k2tog) and make one (in the above picture).Turn.
The wrong side- slip one and purl across.

Keep repeating these steps until you have closed your last gap and made that last stitch in the very base of the corner. Turn the work and purl across.


Your result should look somewhat like this. The end!

If I have skipped to explain something important, don't be too shy to say so! :)

And, now, like I promised, here are some examples of corners made by manipulating the number of stitches different from the number used in the example above. Just for demonstration, I also used a different decrease style for each sample.


This is the result of a short row method used only on the first THIRD of all the stitches. I CO 9 stitches because the total number should, in this case, be dividable with 3 and I stopped excluding the inner stitches when the number of the "left out" stitches has reached 3 (6 stitches in the working row). (Decrease method used: k2tog tbl/k2tog twisted)

You should be careful with this corner because, unless you're working very loosely or intend to severely block your project later- this corner could easily deform the shape of your garment as it does not form the 9o degrees angle.


This is a 6/9 version; I stopped excluding the stitches once there was only one third of all the stitches in my working row (two thirds of all the sts gradually left unknit -6 in this case). In this example, only the peak of the corner is basically rounded. I quite like this one!

As for the middle line, this lovely look is the result of s1k1psso instead of k2tog.

Depending of the gauge,the shape of the garment, the type of yarn you're using etc. you might want to use a different system ; 2/5 , 4/6 etc.

I the end, a few more examples...


To make this lacy middle line, make YOs instead of m1 (make one by picking it up) after each decrease (this is a Eastern k2tog + YO or Continental/English ssk+YO version). Only in this case, you need to purl the first stitch (YO) in every WS row. It's actually quite a funny business to knit a loop with its own tail but the result is cool. Also, bare in mind that this decrease stretches the corner a bit so, you might want to use a different (tighter) decrease for the first 2 gaps and than switch to YOs. That way, you'll, of course, have the eyelets only in the inner part of the corner. But it works just fine with a 1/3 version.


Of course, you can use stitches other than stockinette to make a corner, too. This is the example of a garter stitch corner. You shouldn't have trouble figuring this one out. Just knit on both sides. 1/2 version on 8 stitches again with a s1k1psso decrease.


Finally, in case you decide to slip the first stitch in every RS row, this is how the edge of your corner will look like.

I believe I'm done here! :)))

Wednesday 11 February 2009

Turning the corner around the corner

My friend, who has recently decided to become a knitter, asked me a few days ago  how to turn the corner?! She has already found quite a few patterns but, instead of following the “k2tog and k28" type of instructions, she wanted to know as to how and when the corner "happens" or, as she would put it: “How do we, actually, turn that corner around the corner, anyway?”. Not only have I recruited one knitter, but I have recruited a knitter who wants to know “how it works” rather than just “how to do it (without thinking about it)”! Now, that is my kind of a knitter!!!

And, as for the rest of you; if you're experienced knitters who have learnt this technique 54 years ago and don’t need me to tell you how to knit a few stitches - you're excused. You can go and play outside. I'll call you when the lesson is over. Or you can find some really complicated patterns and look at them while I'm trying to appear smart here! :)))

So, this is how and why!
Turning a corner in knitting is just like making any other corner. Look at the corner of the frame in this picture. The sides of the frame meet in the corner and what a carpenter needs to do in order to avoid the overlapping of the two sides is to adjust the shape of their ends so that they would fit into the standard, 90° corner.
Naturally, when the carpenter making a wooden frame, his job is fairly simple- all he needs to do is to make a good calculation and to cut off the extra bits (or not, if he is Fred Flintstone!) but, in knitting, we cannot do that! So, unless you want to make knitted corners like Wilma Flintstone, I'd suggest you to learn how to turn it properly! :D

So, how do we knit it?
I made this simple illustration hoping that it might help you in understanding what we actually need our stitches to “do” when they reach a corner.


Let's just say that the eight (athletic) tracks in the bottom of the illustration are 8 stitches. The red a line is the beginning of our corner. The red line b is the end of the corner or, even better- the destination of our stitches. That is where they need to get!
Now, look at the route that each of the stitches needs to travel in order to get from the line a to the line b - the routes are not of the same length. While the inner stitch (track 1) is almost already there (maybe a row or two away from the destination), the outer one (track 8) needs to travel a very long way to get to that same position. In knitting language- we need to knit each of our stitches different number of times. 

That is probably the most confusing thing about this shape (the same goes for sock heels!)!¨But the truth is, it is actually fairly simple. The main reason for confusion is hidden in the simple fact that, as knitters, we are generally used to creating a fabric working horizontally – back and forth or in circle! Our work grows in  height (vertically) but we knit horizontally and create ROWS (horizontal lines of stitches). In every next row, a new stitch will grow form the previous one crating a RIB (a vertical row of stitches- tracks 1-8). And, while even the beginner is familiar with horizontal decreases and increases which cause our ROWS to get wider or narrower (horizontally- we're in charge of the situation), we generally take one thing for granted- no matter how many increases or decreases we have previously made in a horizontal line, all the stitches we are currently working with have grown from the same number of stitches knit in the previous rows. In other words, all the RIBS are of the same height (the vertical part is, thus, what we're not in charge of as that part happens naturally!). So, in regular knitting, when we cast on 10 stitches and make 10 rows, in the 11th row we still have 10 sts and they all have 10 rows bellow them.

But, that is not of much use now that we actually need to keep the same number of stitches (horizontally) until the end and yet knit different number rows from each, is it?!

That is why we need the short row method to put us in charge of the growth of each rib (because we're normally only in charge with what happens horizontally).

The Short row method allows us to temporarily exclude some of our stitches from the working process or to simply «put them on hold»! Moreover, it allows us to exclude stitches gradually which is exactly what we need here- you can see that the length of the routes is increasing gradually as well. By leaving the stitches that have travelled enough "on side" and continuing to knit more rows with other stitches   (hence increasing the height of their ribs), we are able to respect every single route from the illustration above.
Once that we have reached the centre of the corner (the diagonal, white line), we can, again using the same method, bring the "forgotten" stitches back into the game and we can, again, do it gradually.
Finally, when we reach the point b, we will have both the same number of stitches on our needles as we did in the beginning and an evenly shaped corner. What more could we ask for?!


Now, let's see how this looks in practice! I'll use a very simple Short row method here!
TURNING A CORNER USING THE SHORT ROW METHOD


I'm working with 8 stitches and the stitches that are currently on my needle are at the a line position (I made a few initial rows just to show you that I can actually knit) :D !
We’re facing the right side of the work and starting with the outer stitch (track 8 in the diagram above). Now, whether you will slip or knit the first stitch of the RS rows is entirely up to you. I’ll knit it.
Then we continue knitting forth all the way to the last stitch . That one we will not knit!


So, step one is to knit across the row and to leave only the last stitch unknit on our left needle. (See the stitch on my left needle? I havent' touched it!)
Why did  we do that? That is our “track 1” stitch (check out the diagram again), the one that is almost already around the corner. It will now have to wait here until we are finished working with the outer stitches.


Now, turn your work (so that you're facing the Wrong side), transfer that first stitch (that is the last stitch that we knit in  the last row) onto your working needle without knitting it and purl across. You now have one less working stitch which, in my case, means 7. Turn your work again.


WE're facing the right side of our work again. In the next row, you will basically do the very same thing- knit across to the stitch that is next to last ONLY keeping in mind that, from now on- the last stitch refers to “the last WORKING” stitch. You can also see that, now that we have already excluded  the lasts titch,  a small gap has formed between it and our last working stitch. It it a great orientation tool, actually, as, foraslong as we continue excluding the stitches from  our work, we only have to find the gap and we'll know how many stitches we have to knit- the working stitch that is right next to the gap, is the stitch that we will leave unknit on our left needle in the current row. It's as simple as that!
So, let's continue- slip or knit the first stitch and then, knit across until you reach the last working stitch and leave it unknit!


At the end of your second short row, you should have two stitches left unknit on your left needle as shown above.


Turn your work again, slip the first stitch as though to purl and purl across. Turn to the Right side.


Start the next row; knit across and put the third stitch “on hold”, as shown in the picture. Turn, slip and purl across.
Your rows will be getting shorter and shorter after each RS row. That’s why they call it the Short row method. :)))


Continue working like that until…


…you’re left with only two working stitches. We are done with putting our stitches "on hold" now!
At this point, our stitches are parallel with the white line from the illustration; we’re in the middle of the corner. Now it’s time to bring all of our “left out” stitches back into the game.


Besides putting the stitches back into the game, we also have to close all the gaps that we have created along the way.
 So, start by slipping or knitting that first stitch and now knit the next two stitches (tracks 7 and 6) together (k2tog or ssk, whichever you prefer) to close that first gap between them (the "green" sts).


Done!
But, since now that we have closed the gap we are one stitch short (we have 7 instead of 8)we need to make one (m1) . So, by pick up a stitch from under the vertical bar between the stitches and knit. (I'm making that stitch in the picture above.) Once done, turn the work, slip that first stitch (the one that we just made) and purl across.
Turn to the right side!


We started working on this row with only two working stitches and now we have three- our rows are now growing rather than shrinking. (They never tell you that there is a Long row part in the Short row method, do they?! :)) )

In your next row you will knit two, close the next gap (the white arrow) by knitting the 3rd (the newly made st) and the 4th stitch together after which you will again have to make one new stitch (m1). It sounds far more complicated than it actually is, I know, but I'm sure that, by now, you know what to do even without following the instructions.
Then you will, again, turn the work and purl across. And again and again.
RS- knit to the stitch next to the gap, close the gap (k2tog), make one (pick it up!), turn.
WS- slip one, purl across.
In every next row, you will have one stitch more to knit before reaching the "gap stitches" (long row!!! ). That is because you're moving back to the center of the corner and gradually including the left out stitches into the working process as you knit along!

Work like that all the way to the last stitch.


Once you close the last gap, don't forget to make that last "extra" stitch to compensate for the decrease (I forget to do it approximately always! :) )
The last gap closed and the last stitch made means that you have just put the "track 1" stitch back into the game.
Turn your work one more time and purl across to give it that last push around the corner! :)


And our corner is now "around the corner". Our stitches have arrived to the b line position.


Now, bare in mind that we use the Short row as a METHOD when turning the corner but there is more than one stitch technique that we can use for it in order to achieve pretty much the same result. I decided I'd use the easiest one that required no additional explanations. Another very common short row technique is called  “wrap and turn” in which we wrap the stitches instead of just slipping them onto the second needle and then knit them together with the wrap on our "way back". The latter method leaves smaller gaps. Apart from some lacy Short rows that include YO-s and can stretch a corner a bit (though, they can be very decorative as well), most knitters decide which version to use depending upon how they want the middle line of their corner to look like. But the principle of the method always remains the same. Turn a few corners by using any stitch technique just to get a hang of it. Later, you will pick your favourite stitch technique or decide which stitch would be best for your current project. 

(NOTE: I’m knitting the Eastern uncrossed style so your k2tog might not look exactly the same as mine if you’re a Continental, English or Combo style knitter but that doesn’t really matter. )

Friday 6 February 2009

Survivor

I thought I'd be writing about something else today but then I came upon a very interesting discovery and decided to change my plans. My philosophy is to always change the plan when I think I have a better idea. You should try it sometime. It never works! The first idea is always better! :)))

But I intend to include a few extremely precious love advices in this post (free of charge!) so I think you'll be just fine!

Now, seriously- as I have mentioned in one of my previous post, I have a huge knitting magazines «library» and that pile of old charts and pictures is one great source of inspiration. I believe that this very moment, I could drain enough fun (and funny) material from it for the next at least 10 posts. And I will surely talk about them often! But this post is about something “NEW”, even for me.

Besides searching for patterns and explanations (at least in magazines printed in languages I can actually understand), the most amusing thing in turning these pages over and over again is the possibility of meeting with The Past- one on one- and seeing how rapidly things change! But also - how easily they are revived with time. It's almost like a time machine. One year I open the "year 86.” and I can't help but laughing out loud to what people back than used to think was actually cool. I wake up a year later and suddenly all these funny ladies from the ’86. issue are running into me in the street; their sweaters, legwarmers and bows are screaming that the OLD funny ’86.- is back! It’s IN again! It usually takes these garments about 4 years after they’re OUT (one more time) to gain the “can that be???” label in my perception again. It’s interesting, actually, that I generally never find blouses from, say, 70's or 60's to be funny- it’s always the 80's that make my day! Which is funny because I quite fancy that 80's hysteria and Cindy Lauper style. I was a kid when these things were IN and anything I’d see grown up women wearing at the time looked beautiful. I guess I still have that code hidden somewhere in one of the trunks in my brain. Pink eye-shadow, yellow lipstick, haircuts higher than the Eiffel tower....not the plastic earrings, though. I'll never digest those.
Of course - the suggested garments were, more or less, always the same; sweaters, shawls, hats, dresses, cardigans…only, each time they were “rediscovered”in the spirit of the present time, “re-painted” into more fashionable colours, “redrawn” into more acceptable designs; baggy, stretchy, loose, tight, bell-shaped, narrow, round, square (SHOULDER PADS!!!!!)…

So- this is how it generally goes- things from my magazines are either IN or temporarily and momentarily OUT. The first category is then divided into two subcategories- NEW IN (rare!) and RETRO IN which, translated into plain words, means- OLD and revived. Only now MODERN.

Well known "old" garments but a bit changed and adjusted. All but one! The one that has managed not only to survive but to preserve its authenticity and original shape (and drape) AND to stay IN regardless of the fashion era it is currently walking through.


Do you know who the mystery survivor is? Mr. YOKE Sweater (and his friend Mr.YOKE
Cardi, naturally!). I'll never know how HE does that but no one changes Mr. YOKE!
It is not, of course, always AS popular! In the 70's - everything was pretty much "yoke, even dresses and skirts, shawls and totes. In the 80's there were at least 2-3 patterns in each magazine plus I believe it was then that they invented yoke socks. I don’t think you'll find more than one Yoke sweater per issue now days but – Mr. Yoke sees absolutely no reason not to show up as a priority guest in a 2000.-something Vogue knitting winter issue. Or to be made from pure cashmere by Debbie Bliss. Still alive. And still original! Mr. Yoke!
Let' me share some of the pictures with you!
(You can enlarge each picture by clicking on it)


I'm starting with the late 80's, a bit upside-down but it doesn't really matter. The book was called "Master Knitting- 59 Most Beautiful Sweaters in the World" (+100 stitch pattern samples), nothing sensational, very "shoulder pad-ISH" , yet- among 59 most beautiful sweaters of the era, I have found 10 Mr.Yokes! My book is from the '88. but I think that the first edition was published earlier i the 80's.


If it weren't for these purses, I could swear this picture was taken only two or three years ago.
A.N.D. here come pink plastic earrings!

And a cardi, of course! This girl looks funny, doesn't she? And so does my finger in the bottom left corner of the picture!

A ribbon? In hair? Didn't I tell it was like travelling in a time machine?!

They don't come in black very often, that's why I like this one- especially the white dots! And this lady is so beatiful if I may notice.

As for the second one- that's my favourite! The colours are outstanding! So lovely!
The year is 1986.


What could the two of them possibly be looking at?
(Earrings again!!)


They had those too! "All inclusive" packages! A Yoke sweater plus a pair of legwarmers and a hat with the same pattern!

Year 1982.

Don't know how to find THE MAN OF YOUR LIFE and you're a passionate knitter? Just put your favourite hand made YOKE sweater on (cardigan will do as well) and go out for a walk! What you're looking for is a man in a yoke sweater (similar combination of colours - preferable!). Once you spot him- smile at him- he will surely approach you and ask the following question :" Did you make that sweater yourself?". Answer him with a plain and loud "YES!". To that and to any other question he may (and will) ask you in the future.


Just look at these two! Isn't that just the perfect example of what I have just been telling you?

She hasn't had her hair done in over a year and she couldn't care less! She is in love, he is in love with her and they're wearing Yoke sweaters! (Didn't I also say how important a similar taste in colours is? )
Year 1986.

Now, look at these two! He hasn't had a decent hair-cut in a year and still- she loves him. (Though I'm not really optimistic about relationship given that she was obviously not paying enough attention to the matching colours "rule"! But this is another evidence that cardigans work as well!)
I like these two youngsters (who are now probably 70 years old!).
The picture is from a magazine published in the 1977.

And, finally, it's 1990. and the yoke cardi is still in the game.

I'll skip the modern part of the history, you probably have enough evidences of the presence of Mr.Yoke in the contemporary fashion yourself.

So, what does this all tell you- THERE ISN'T A SINGLE NORMAL REASON WHY YOU SHOULD NOT OWN (MUCH LESS- KNIT) A YOKE SWEATER.

1. It's timeless
2.It has won more battles with the fashion changes than any of my neighbours will ever win with me (I don't care people could not escape from the building in case of fire because of my plants)
3. It's a great thing to wear when you want to be dressed casually
4. You can make a tight yoke sweater and look sexy
5. You can make a tight yoke cardi and unbutton it (just a bit) and everyone will tell you you're sexy
6. You can make an over sized yoke sweater and still look cool
7. You can wear the over sized yoke sweater when his mother invites you over for dinner
8. Every mother would want her son to marry a girl in a yoke sweater
9. You can always wear the tight yoke sweater when his mom is not around (the unbuttoned version)
10. You can't really call yourself a Knitter if you still haven't made your first yoke cardi/sweater
11. Barbie and Ken wear Yoke sweaters

I believe my point has been made!

I'm taking my Yoke sweater out of the closet right away. No, I didn't make it, my mom did, somewhere in the 80's and it was for her. (It's got hearts!) She made a small cardi version for me and my best friend- I remember they had dears on the bottom and they were brown-white-pink. We LOVED them- they looked reminded us of black&white chocolates with strawberry filling. I'll find mine one day, it's still somewhere in the house. (I don't think I'll fit into it any more, though! :) )


These sweaters really do last for ages, don't they?

Related Posts Plugin for WordPress, Blogger...